Showing posts with label Product Review. Show all posts

Wednesday, October 9, 2013

Lessons on Old and New Scissors

Assorted Scissors 


The scissors at your fly tying desk are a really critical part of your tying arsenal. Admittedly, it has taken me a while to get a good grip of what scissors I like and how to make use of different types of scissors. I give full credit to my various local mentors, online videos, and some good old trial and error. I hope this article will pass my lessons on to others.


All Purpose Scissor
Terra Fly Tying Kit
Like most folks, I started with the basic scissors that came with my fly tying started kit. At this point I would never buy scissors like that again. That has little to do with any fault of the scissors themselves, but there are scissors I find more apt for tying.

Obviously, scissors are all about the blade shape and size.

The basic fly tying scissor is an all purpose shaped blade of medium length. These are solid scissors, but they are almost always bound together by a non-removable screw/rivet and can't be easily sharpened. They should fit easily in most hands, but big thick fingers will always have challenges with tying scissors, sorry maybe open loop scissors can help.

4" Razor Scissors
My favorite all purpose scissors are Dr. Slick Razor Scissors 4". These are super sharp and taper to a near micro tip size. They fit really well in my hand. I tie with my scissors in my hand at all times and the size in hand is important to my comfort at the vise.  The adjustable tension is also very nice to make for comfortable and delicate control. I also just recently purchased the Allen Fly Fishing equivalent of this scissor but, I haven't had it long enough appropriately to comment on its use. However, the scissors have a remarkably similar feel.

Razor tip
In the line of tension scissors I also have the 5" Razor scissors made by Green Caddis Outfitters. This size is a little big for my hand held approach and the tip doesn't taper as small as the Dr. Slick's, but they are great for cutting things like foam or dear hair when I need a long straight cut.

From Left to Right: Allen 4" Razor, Green Caddis 5" Razor, 4" Dr. Slick
My final point about the wonders of razor scissors is that they can be sharpened. Since a removable tension screw is what holds the blades together they can be removed and sharpened like a knife.  They should only be sharpened on a very fine flat ceramic (I will follow up on sharpening in another blog). If you have immediate questions shoot me a message on Facebook.

I also keep a pair of curved tip scissors at my desk which are great for setting the curve of deer hair flies or cutting the mouth out of Morrish hopper bodies.

Allen Micro tip
Micro tip scissors are in my "not used to often drawer" at the tying bench, but they are there for a reason. I don't tie for freshwater trout often, but when I am working on small nymphs they can be a real asset to deal with the small hook size. (the current pair is also from Allen Fly Fishing)


Finally I use a set of craft scissors to deal with anything
that will heavily wear on scissors like cutting dear hair off the hide. A trick I picked up from Pat Cohen's DVD. Don't get me wrong these should be high quality craft scissors. As with all scissors its about a sharp edge.

As I mentioned before, when you get into fly tying for the first time you usually end up with basic scissors. However unless you started out well mentored (unlike me), you will dull these scissors very fast because you didn't realize you should really have at least two pairs of scissors each for dealing with different materials.

Fear not......Those dull scissors can have lots of uses.


The foremost use I have for just about any dull scissors is cutting wires. Admittedly, I don't use them for heavy wires like bite tippets, but for most ribbing and lead wires they work well. Once you have dull pair that means you don't have worry about using your sharp scissors.  An additional advantage once you have your wire tied on a fly is that dull scissors fit into tight spaces a lot more easily the standard wire cutters.

If you happen to have dull pair of arrow scissors I substitute the notch below the blades on mine for wire cutters to separate bead chain eyes. I have used it for up to large size eyes without any problem, but I tie with medium eyes for most flies. The notch is more then enough to deal with medium bead chain.


I hope these tips help you take make full used of scissors. If you have any further questioins message me on the Siren Flies Facebook Page

Thursday, August 29, 2013

Commentary on Fiberglass Fly Rods

Anyone who has read some of my previous posts knows I'm a big advocate of getting involved with your local fly club and again I am drawing on my experiences with the Alamo Fly Fishers as the basis for this commentary.

I give credit to Cameron Mortenson of the Fiberglass Manifesto for first peaking my interest in glass rods, but I admit to knowing little or nothing about them when I first discovered his blog. Then as I got involved with Alamo Fly Fishers I got know several members that swore by glass rods for "perch jerk'n."

"Perch Jerk'n" is targeting sunfish and the occasional black bass. Here in central Texas that translates to wading in gin clear streams and targeting fish in shade (even fish know to get out of the heat in Texas summers). In general, I would be fishing flies in size 10 or 12 (check the Siren Flies Facebook page for the flies).

Initially, on these "perch jerk'n" fishing excursions I fished my graphite rods, but found myself very quickly moving from a 5wt to a 2wt to get the most action our of these hard fighting little fish.  My fishing buddies, however were casting old glass rods (the enthusiasts will appreciate that they were either Fenwicks or Wonderods) ranging from a 3wt to a 6wt.

I got the chance to cast them once or twice and could not get over the flex in the rods......the term noodle seemed appropriate.....I knew I wanted to try one for a day of fishing and looked around for a cheep deal online. I ended up with an eagle claw feather light 4/5 wt  and fished it, but never could quite find the right fly line to suite it from those I owned. (Update: I settled on a 6 weight...no idea on the brand...it was buried in box I had not opened in along time). I was pleased to discover that even this inexpensive rod felt like the "ultralite" fishing my buddies had described, and like all good fly fishermen that meant I needed to try out some other rods


Next came  Cabelas CGT glass rod. This is a rod I really like and would be my recommendation for an easily available rod to start with. The above Eagle Claw is cheeper, but I think $150 gets you a very good rod (and if you watch the online bargain bin they seem to go on sale regularly. The 3wt CGT I own has all the bend I wanted, but admittedly casts on the faster end of glass.

In response I decided I had to go old glass to get more feel for  my glass exploits. To Ebay and flea markets I went....

I'm still questing for the perfect feel and to be fair I know more now....but I consider myself a novice about all this stuff.  I now have an 8 wt St. Croix glass rod(casts a 7wt SA redifsh line great), a yellow Wonderod #1370B-8'6" (approx. 8wt), a 7wt Action Glass, and a spin fly combo wonderrod (6wt). These older rods definitely get you a different feel in your casting and offer unique benefits in the right situation. There are limitations the slowness of these rods would limit their utility in high wind situations like the jetties, and thats not what  I when I need to punch line out into the wind. Just to be clear I can get plenty of distance with glass rods, but the slowness leads to greater influence on the line by the wind.

Ultimately I have these final thoughts. Put the right tool to the right task. You can throw 7 wts and greater on our TX streams, with small flies and catch fish, but you will lose so much of the battle happening with that sun fish and small bass. In contrast should you hook into a large fish on a smaller glass rod it will have the back bone to handle it, but the flex will ensure you feel every turn the fish makes.


Go Glass on rivers in Central TX and you will never look back.

Monday, August 5, 2013

Umqua Fly Patch

I shared the Umpqua Fly patch on Facebook as soon as I first saw a picture of it and then stumbled into it in a fly shop this several months ago. I was on my way to river at the time so the patch went along for its first trip to water that day. Since then it has been a constant companion.

Overall I was very happy with the patch. I wanted the patch as a either a minimalist fly "box" or a quick place to stash flies as they are being fished or changed out. In light of those goals I feel I got what I wanted.

The patch has two ways of holding flies. 1) Slotted foam 2) Magnetic plate.

The slotted foam is nice, but it is "trout fly" size foam. In other words it is not suited for large flies on saltwater hooks.

The magnetic plate is a nice place to put a fly while doing other stuff (i.e. chasing down a leader blowing in the wind). Personally I like to keep my flies more secured then with only the magnetic plate, but this is a purely personal preference. The plate does seem to hold flies very well.

The patch is definitely large enough to hold a days worth of flies once totally loaded...if you are not the type to carry a million flies.....most of us are....its ok. In such cases the patch is a nice complimentary tool to use.

I  was surprised by the number of different ways the patch can be attached: 2 clothes pins, carabiner, velcro, and lanyard. The velcro particularly caught my attention since its has an adhesive patch that could be put any number of places (I.e. boats, fly boxes, tying travel kits, etc).

Pros: versatile attachement points, lots of space for size 10 or smaller flies, strong magnet.
Cons: Foam slots don't hold large hooks well,  Bulky flies will over lap and limit space.


Monday, January 21, 2013

Flipboard for the Fly Fisherman (Product Review)


I have been searching for a free app to use on my IPad to stream line all the digital media I enjoy for fly fishing. I have tried several (e.g.Pulse, Blog Shelf and Gwhizz), but without a doubt the one that works best for my tastes is Flipboard. Its available for most tablets (Android or IOS) and it has channels for all the primary media forms I follow. These include, but are not limited to Twitter, Facebook, Tumblr, Blogger, Google Reader and Instagram. There is also a channel for the Orvis News Feed too. It formats the various channels to a magazine style flipping page that can be expanded to both zoom on pictures and expand article items. Additionally, once expanded the original webpage is often displayed below for easy access.

Fly fishing is the major interest I use Flipboard for, but it also includes many other channels focused on news, technology, movies, photography etc. 

Below you will find an intro video produced by Flipboard and in my previous blog post is the bare bones demo they made as well. 

Pros: Flipping through items is very intuitive and the motions needed to flip to a new item or close it are the same on every page. Easy transition from Flipboard to the original web page. Allows commenting on photos and posts from Flipboard to social media like Facebook, Instagram, etc. Facebook pages can be turned into their own channel. 

Cons: Some picture files do not always make it from the blog into the Flipboard format (only one or two blogs I read have this problem). Searching for new channels produces a results page that likely includes the media your seeking, but I found it often placed it in an unexpected part of the results page (make sure and scroll down if you do not find what you seek).


Thursday, January 17, 2013

Preview of an upcoming Product Review

Here is a preview of my favorite app for tracking all the fly fishing media I follow (including Twitter, Facebook, Google Reader, Instagram, etc.)  I working on a full review specific for Fly Fisherman so keep an eye out for it.

Tuesday, October 30, 2012

Smith Fly Stream Team Gear

I'm now happy to be a member of the Smith Fly Stream Team. As a member I get to enjoy some of their unique modular gear.

Below are some photos of the items I received, but you should look at some of the other items they carry on the Smith Fly site. I was most impressed by how heavy duty the materials actually are once you touch them. The pictures on the website don't reflect the durability you can feel as soon as you hold the item. Removing and re-attaching the modular pockets is super easy as well.


I also want to thank the The Fiberglass Manifesto for the stickers included in the box. I've got a couple boxes that needed to become a comrades.


 Utility belt makes you feel like a fly fishing Bruce Wayne.

Lots of boxes fit in the bag.

Tuesday, October 16, 2012

Product Review: C&F Permit Box

Like many fly fisherman I'm a total fly box junkie. Some new box comes out and I have to give at least one version of it a try. As you might expect....I now have and use quite a few different boxes. In general, I prefer the foam slit type boxes over foam "steps" where the hook punctures the foam.


My latest acquisition in this kind of box was the C&F Grand Slam Permit Box (Model: CFGS-3544).

Why this box?
I was looking for a box to carry on me in the surf. Thus it needed to be waterproof and large enough for surf flies (usually size 6-1/0). The C&F Grand Slam Tarpon box was also in the running originally, but when I went looking for it, I found out it was on back order. Of late the club members have also been talking about saltwater flies for the surf at our local fly tying meetings and in general the fly sizes are remain at the smaller end of the aforementioned range. Thus I felt the permit box would do the job well for my purposes.

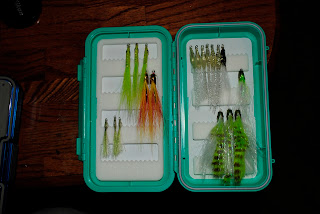
In Review:  C&F Grand Slam Permit Box (Model: CFGS-3544)


Waterproof: It kept the tissue paper inside completely dry when submerged. It also floats, as one might expect.


Holding Flies: My largest concern was that the flies in the lid would be crushing those on the bottom of the box. I'm happy to say that was not the case with the flies I tested. The largest was tied on a size 1.
I'm sure if you tried, you could make a bulky fly large enough to get crushed in this box, however I have a large fly box for just that kind of fly too. 


The only concern I see is with the length of the flies. Most of tails of my flies reach past the the next row of foam. A little pre-planning in fly placement can solve this problem, and most of the flies I used in the photo shoot came out of my large fly box.  The next series of ties on the blog will probably be flies tied to fill this box.