Wednesday, October 31, 2012

Fly Gallery: Guadalupe Virgin

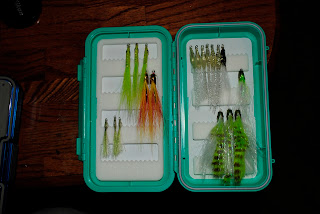
Another Tuesday night fly tying session with the Alamo Fly Fishers has come and gone. I'm taking on a new type of fly tying or rather embracing an old one. Up until now I had never had a reason to take on classic Carrie Steven's style streamers (see Streamers 365 for more patterns), however among my fellow local club members these kinds of streamers are a staple of trout fishing on the Guadalupe River in Central Texas. Thus, I have decided to take on mastering how to tie these kinds of streamers so that when the rivers get stocked this season I will have a fly box ready for them. There will be more to come about the techniques used in a later post.

For now the recipe goes in the Fly Gallery.

This fly is tied out of materials I had on hand following the general recommendations of my fellow tiers. Thus, its is untried on the water so I have decided it must be named a virgin fly. Perhaps some divine grace may lead to it being successful. I will make sure and up date once it hits the water.
I don't think this is my best fly ever, but I am happy to post it because I think people get too concerned about how flies look when you are first learning to tie them. More of these type of flies will come and I want people to see how they improve.

The Guadalupe Virgin


Hook: Size 8 Streamer
Thread: Black UTC 140
Butt: Red UTC 140
Body: Single Strand Light Green Yarn
Rib: Silver Flash/Tinsel
Throat: White Bucktail
Wing: Badger Hackle
Shoulder: Hen Saddle
Head: Black 

In classic streamers, a Jungle Cock eye is usually attached, but my budget and my fellow tiers deem it unnecessary. 

Tuesday, October 30, 2012

Smith Fly Stream Team Gear

I'm now happy to be a member of the Smith Fly Stream Team. As a member I get to enjoy some of their unique modular gear.

Below are some photos of the items I received, but you should look at some of the other items they carry on the Smith Fly site. I was most impressed by how heavy duty the materials actually are once you touch them. The pictures on the website don't reflect the durability you can feel as soon as you hold the item. Removing and re-attaching the modular pockets is super easy as well.


I also want to thank the The Fiberglass Manifesto for the stickers included in the box. I've got a couple boxes that needed to become a comrades.


 Utility belt makes you feel like a fly fishing Bruce Wayne.

Lots of boxes fit in the bag.

Monday, October 29, 2012

Bend-Back Fish Skullz


Bend-Back Fish Skullz
This is a new fly I designed for use on the flats. It should run hook up and sink relatively quickly with a nice profile.

Hook: Size 1  (gently bent to shape)


Thread: Ultra Thread 210

Head: Fish Skullz (medium

Under Body: yellow bucktail
Over Body: red bucktail


Wednesday, October 24, 2012

Wednesday Fly Gallery

Tuesday Nights is The Alamo Fly Fishers weekly fly tying night when its not a formal meeting. In light of this fact I will probably be doing a a fly gallery most Wednesdays with whatever I tied the previous night.

Richard Strolis of Catching Shadows is one of my favorite fly tiers. I felt like tying small this week so I tied one of my favorite midge patterns he designed. I have also linked the tying video he did through the flies name.

The Slasher by Richard Strolis

Hook: TMC 2487 size 18
Thread: Ultra Thread 70
Head: Glass bead
Under Body: Wrapped Midge Flash
Over Body: Wrapped Micro Stretch Tubing
Wing: Tag end of Midge Flash


Monday, October 22, 2012

Marabou Deceiver

This fly is a variant of the classic Deceiver  It functions as a general baitfish pattern, but a few minor changes in color of thread or marabou can make a fly that works for any water clarity situation. This one is tied for my saltwater fly box for redfish and trout on a size 1 hook, but it can be tied on many different sizes.

Step1: Tie in a thread base to about the barb of the hook. Tie in the marabou tail


Step 2: Bring the thread forward to just in front of the hook eye. Then tie in the buck tail so it spins around the hook evenly.

Step 3: Build a thread head and attach the stick on eyes.


Step 4: Add epoxy to the head and move to rotary dryer.


Step 5:Once dry, coat the epoxy head in nail polish.
Alternative color thread makes for some nice hot spots in the fly. You could also add some flash if you want.
Other color combinations: Red and Yellow, Black and Chartreuse, Red and White

Thursday, October 18, 2012

The Blood Shiner

The Blood Shiner
Hook Size: 1
Thread: Orange 210 Ultra Thread
Wing: Baitfish Emulator Flash
Gills: Red Yarn
Head: Sitck on eyes and 5 min Epoxy


Tuesday, October 16, 2012

Product Review: C&F Permit Box

Like many fly fisherman I'm a total fly box junkie. Some new box comes out and I have to give at least one version of it a try. As you might expect....I now have and use quite a few different boxes. In general, I prefer the foam slit type boxes over foam "steps" where the hook punctures the foam.


My latest acquisition in this kind of box was the C&F Grand Slam Permit Box (Model: CFGS-3544).

Why this box?
I was looking for a box to carry on me in the surf. Thus it needed to be waterproof and large enough for surf flies (usually size 6-1/0). The C&F Grand Slam Tarpon box was also in the running originally, but when I went looking for it, I found out it was on back order. Of late the club members have also been talking about saltwater flies for the surf at our local fly tying meetings and in general the fly sizes are remain at the smaller end of the aforementioned range. Thus I felt the permit box would do the job well for my purposes.

In Review:  C&F Grand Slam Permit Box (Model: CFGS-3544)


Waterproof: It kept the tissue paper inside completely dry when submerged. It also floats, as one might expect.


Holding Flies: My largest concern was that the flies in the lid would be crushing those on the bottom of the box. I'm happy to say that was not the case with the flies I tested. The largest was tied on a size 1.
I'm sure if you tried, you could make a bulky fly large enough to get crushed in this box, however I have a large fly box for just that kind of fly too. 


The only concern I see is with the length of the flies. Most of tails of my flies reach past the the next row of foam. A little pre-planning in fly placement can solve this problem, and most of the flies I used in the photo shoot came out of my large fly box.  The next series of ties on the blog will probably be flies tied to fill this box. 


Saturday, October 13, 2012

Surf Candies


I'm a big fan synthetic materials for flies and while epoxy can be a challenge to work with I enjoy using it in many flies. UV resins seem to be preferred by most tyers over epoxy and there are plenty of reasons why. I cannot speak from personal experience with UV resins....yet, but I will get some soon and probably post about a comparison of epoxy to UV resin in another blog.

For now my surf candies are tied with 5min Loctite Epoxy. Any tyers who have worked with epoxy must learn some tricks to using it. My initial surf candies reflect a lack of theses techniques.  The result is a still fishable fly, but a lack of the picturesque fly all fly tyers want.
As with all tying that I have trouble with I look for some information in my local club. I had searched online for a while to see if I could find some more information to correct my poorly formed surf candies, but UV resin dominated the videos and blogs. However, at our local tying night I got the secret I was missing from a fellow synthetic matierials fan. I already owned a rotary fly dryer and had been using it, but the missing piece of the puzzle for me was the first layer of epoxy. At the suggestion of my fellow club member, I began using my bodkin to work the first layer of epoxy into the super hair fibers.  You need to lift the fibers up from the hook and place the epoxy under and through them. This will probably result in some clumping of the epoxy.


Once the fibers are coated flatten out any clumps of epoxy by running your bodkin along the sides top and bottom.  Remeber this is only layer one, the coat should only be enough to hold the fibers into shape. Two big things to remeber: 1)Watchout for the eye of the hook when you apply and smooth epoxy. 2) Epoxy will drip be prepared to deal with it dripping off the hook.


Once the epoxy is evenly distributed, hold the fibers in the position you want them to set in. This can be very tight or splayed out as you prefer, but this is the stage to decide its shape. The form should set in a minute or two. Once it has set, transfer the fly to a rotary dryer or leave it aside to dry. I usually will type several bodies before I mix epoxy then epoxy them all at once.


Once dry, eyes and any other decorations (gills, glitter, etc) can be added. Make sure all these are dry and firmly attached before adding the next layer of epoxy. This layer will make the classic shape of the surf candy.  Once the coat is evenly distributed around the fly move it to the dryer and let set.


The final step is to coat the fly in clear nail polish to cover the tacky outside of the epoxy.
Then go fishing.
Fly pattern developed originally by: Bob Popovics


Thursday, October 11, 2012

The Logo


The logo of this blog is a Greater Siren (Siren lacertina). This amphibian, like this blogger, lives in Texas waters.  The goal of this blog show flies and fly tying techniques that are useful on Texas waters, but could be applied all over the country.  I will also review new products from a variety of companies. I'm also formally trained as a fish biologist and will likely pass on some interesting fish information as it comes across my desk.